If you ask me which single piece of gear decides whether a trekker enjoys the Manaslu Circuit or spends half of it limping, I will tell you every time that it is footwear, not the down jacket, not the sleeping bag, not even the trekking poles. This route starts in warm, humid valley air near Machha Khola at around 930 meters, climbs through gorge trail cut into cliff faces with stone steps and long suspension bridges, then keeps rising until you are walking on packed snow and ice at Larkya La at 5,106 meters before dropping into Bimthang at roughly 3,700 meters on the other side. Very few treks in Nepal ask one pair of boots to cope with that much range of surface, temperature and footing in a single trip. I have walked this circuit more times than I can count while leading groups, and the trekkers who struggle are almost never the ones with the fanciest jacket. They are the ones whose boots are wrong for the day, or new out of the box, or a half size too small for feet that swell after ten days on the trail. This guide is my honest, practical rundown of what to buy, how to break it in properly before you fly, and how to look after your feet so that the trek in your memory is the scenery and not your blisters.
Why Footwear Matters So Much on This Specific Route
The Manaslu Circuit is not a single environment. It is closer to four or five different treks stitched into one itinerary, and your feet feel every transition. Early days along the Budhi Gandaki river are warm, dusty and often wet underfoot from spray off waterfalls and short stream crossings. Mid trek days through Deng, Namrung and Lho involve steep stone staircases, roots and uneven rock that punish a soft, flexible shoe. The final push toward Samagaon, Samdo and then across Larkya La brings frozen ground in the early morning, old snow that has been trodden into hard ice by yak trains, and a long, knee jarring descent on loose scree and moraine on the Bimthang side.
A boot that is perfect for the warm lower valley will not protect your ankles on the scree below the pass. A stiff mountaineering boot bought for the pass day will feel like a lead weight and will cook your feet during the first week of subtropical walking. The right answer, for the vast majority of trekkers doing this as a full circuit rather than a technical climb, is a single well chosen pair that leans toward the sturdier end of the trekking boot category, not a mountaineering boot, and not a lightweight trail shoe either. I will explain exactly why further down. If you have not already read our route guide for the Manaslu Circuit Trek, it is worth reading alongside this article because it lays out each day’s terrain in more detail than I can repeat here, and that terrain detail is exactly what should drive your gear choices.
The Terrain Your Boots Actually Have to Handle, Stage by Stage
It helps to think about footwear demands day by day rather than as one abstract idea of a Himalayan trek. Here is roughly what your feet will be doing on a typical Manaslu Circuit itinerary.
From Soti Khola or Machha Khola through Jagat, the trail runs low in the valley, often close to the river, with short rocky sections, farm paths and some road walking on the newer jeep track. It is warm, sometimes humid, and your feet will sweat. This is where breathable uppers matter more than raw toughness.
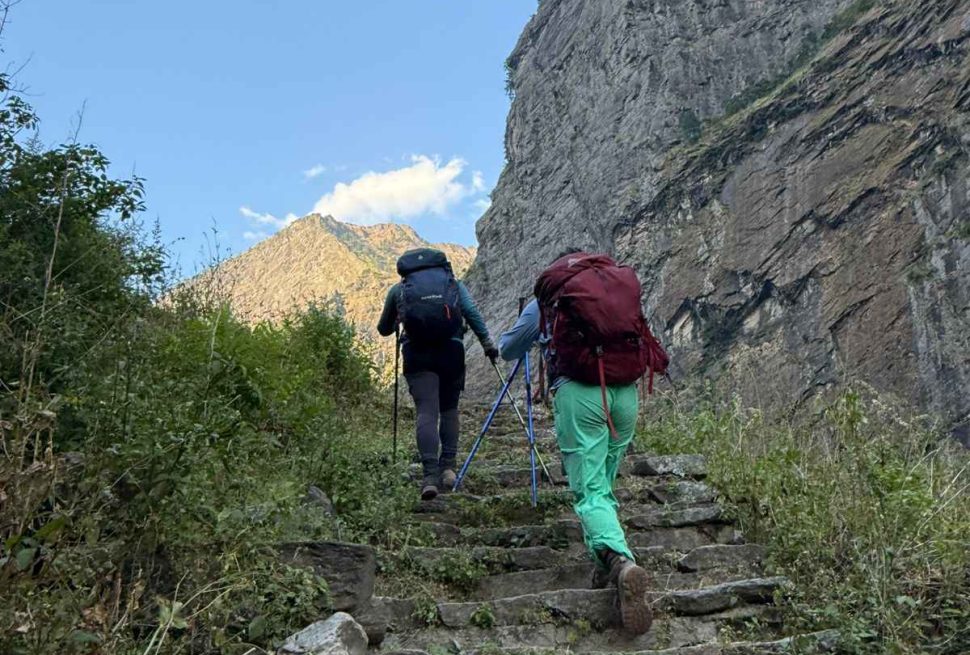
From Jagat to Deng and on to Namrung, the trail narrows into a proper gorge route with stone steps carved into cliffs, landslide sections that get rerouted year to year, and a string of long suspension bridges swaying over the Budhi Gandaki. Footing is uneven and exposure increases. This is where sole stiffness, a solid toe box and secure ankle support start to earn their keep, because a rolled ankle here, with a drop beside the trail, is a serious problem rather than a minor inconvenience.
From Namrung up through Lho, Shyala and into Samagaon, you gain altitude steadily and the trail becomes rockier and colder, especially in the mornings. Overnight temperatures at Samagaon can sit well below freezing outside of the main spring and autumn windows, and puddles on the trail freeze solid overnight.
From Samagaon to Samdo and up to Dharamsala (also called Larkya Phedi), you are firmly in high alpine terrain, walking on frozen ground, loose moraine and patches of old snow, often before sunrise if your guide has you moving early to beat the wind at the pass.
Larkya La itself, at 5,106 meters, is where boots are tested hardest. Snow cover varies by season and by year, but it is common to be walking on hard packed snow, refrozen ice patches and sometimes fresh snow on the approach and descent. The far side drops steeply toward Bimthang on loose rock and moraine, a descent that is brutal on toes and knees alike.
Once you reach Bimthang and continue down toward Tilije and Dharapani, you rejoin warmer forest trail and eventually road, and the temperature and terrain soften again. Our difficulty assessment for the Manaslu Circuit goes into more depth on how these stages compare in exertion and technicality, and I recommend reading it if you are still deciding whether this route suits your fitness level, because footwear choice and trek difficulty are closely linked.
Mid Boots or Full Mountaineering Boots, What This Trek Actually Requires
This is the question I get asked most often, and the honest answer disappoints some people who were hoping to justify buying the big double boots they saw online. For a standard Manaslu Circuit Trek, done as a trek and not as a technical climb of Manaslu itself, you do not need a full mountaineering boot. You need a sturdy, supportive trekking boot, sometimes called a backpacking boot, that sits above the ankle, has a fairly stiff midsole and is built with genuine winter conditions in mind.
Full mountaineering boots are designed around crampon compatibility, insulation for standing still at extreme altitude, and rigid soles built for kicking steps into ice on technical mountaineering routes. They are heavy, often two to three times the weight of a trekking boot, and that weight adds up brutally over twelve or more days of walking six or more hours a day. They also run hot in the lower valley, where daytime temperatures can be pleasant and even warm, and a boot built for minus twenty at altitude will make your feet miserable at 30 degrees Celsius near Machha Khola.
The crossing at Larkya La, while snow covered and cold, is a walking pass, not a technical climb. Trekkers cross it every season in good trekking boots, moving on foot without crampons in normal conditions, sometimes using microspikes if the guide judges the ice to be particularly hard that morning. That is a very different demand than what mountaineering boots exist to solve. If you already own a pair of stiff, insulated mountaineering boots from a previous expedition and they fit you well and are broken in, there is no harm using them, but I would not recommend buying a pair specifically for this trek. It is the wrong tool bought at real expense for a problem this route does not actually present.
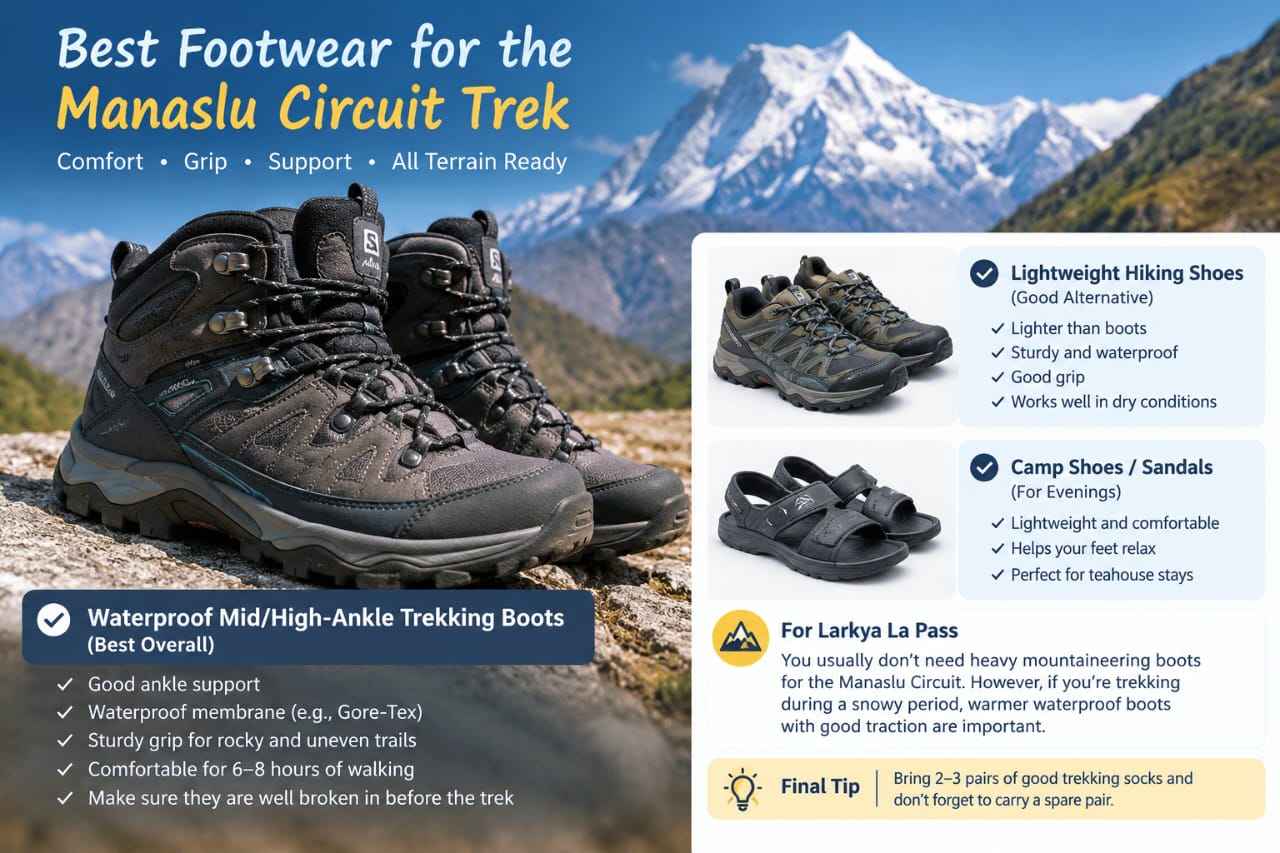
What you want instead sits in the middle of the range: a boot taller than an ordinary hiking shoe, with a supportive ankle cuff, a fairly rigid sole that will not flex painfully under a loaded pack on rocky steps, a genuine waterproof and breathable membrane, and enough room and insulation to keep your feet reasonably warm on the cold mornings around Samdo and the pass itself, worn with a good sock system, which I will cover later in this guide.
Key Features to Look For
Once you accept that a mid weight to sturdy trekking boot is the target, not a mountaineering boot, the next step is knowing what to actually check when you try boots on or read a spec sheet online.
Ankle support. Look for a boot that rises well above the ankle bone, with a supportive but not overly rigid cuff. On the gorge sections between Jagat and Namrung, and on the loose descent to Bimthang, a rolled ankle is the single most common injury I see on this trek. A boot that locks the ankle in place, combined with a proper lacing technique, prevents most of these incidents.
Waterproofing. A genuine waterproof and breathable membrane, Gore Tex being the most common and trusted, matters enormously here because you will cross wet stream sections, walk through slush near the pass, and possibly deal with rain in the lower valley depending on season. A boot without a membrane, relying only on treated leather, will eventually soak through on a trip this long.
Sole stiffness. You want a sole stiff enough that it does not fold under you on uneven stone steps or when you are standing on a small rock edge crossing a stream, but not so rigid that every step feels like walking in a ski boot. A moderate to firm midsole, often built around a nylon shank, is the sweet spot for this trek.
Toe protection. A reinforced toe cap, usually rubber, matters more on Manaslu than on many other treks because of the amount of rock scrambling on the gorge sections and the loose moraine near the pass. Stubbed toes on rock are common and a good toe cap prevents both pain and boot damage.
Traction. Look at the lug pattern and depth of the outsole. Vibram soles with deep, widely spaced lugs shed mud well and grip on wet rock and packed snow far better than a shallow, worn tread. This is one area where an older, well used boot with a tired sole becomes a real liability at exactly the point in the trek, the pass day, where you need grip the most.
Fit and volume. Feet swell on long trekking days, especially with several hours of continuous descent, so a boot that feels snug in the shop can feel painfully tight on day eight. I always recommend trying boots on in the afternoon, wearing the actual sock combination you plan to trek in, and leaving a genuine thumb width of space in front of the longest toe.
Are you interested in mountain photography and videography and looking for a quieter Himalayan route with more time at key…
Boot Brands and Models Worth Considering
There is no single correct boot for every foot, and I am wary of anyone who tells you there is. Foot shape varies enormously between brands, Scarpa tends to suit a narrower, lower volume foot, while Lowa and Zamberlan often suit a wider foot with a higher instep, and no amount of online research replaces trying boots on in person if you can. That said, based on what experienced trekkers and reviewers consistently rate well for multi day mountain treks with a snow crossing, a handful of brands and models come up again and again.
Salomon’s Quest series, including the Quest 4D GTX line, is a long standing favorite among trekking guides because of its supportive chassis, reliable Gore Tex lining and a lacing system that locks the heel down well on steep descents. Scarpa’s mid weight trekking range, including boots often marketed as their trekking or backpacking line, is known for a precise fit and genuinely stiff, protective sole that holds up well on rocky gorge trail. La Sportiva’s trekking boots, including models from their Trango and Nucleo ranges, are respected for a mountaineering pedigree brought down into a lighter trekking boot, with strong toe protection and confident traction on mixed rock and snow. Zamberlan’s leather backpacking boots, their Vioz line being a well known example, are heavier but extremely durable, favored by trekkers who want a boot that will outlast several major trips and who do not mind the extra weight in exchange for that longevity and warmth. Meindl’s Bhutan and similar mountain boots have a strong following among European trekkers and guides for their wide toe box and comfortable long term fit, particularly for trekkers with wider feet who find narrower Italian brands pinch.
The table below is a general comparison to help you think about the tradeoffs rather than a ranking of one being definitively better than another, since fit on your own foot should always be the deciding factor.
| Boot Type or Example | Typical Weight | Ankle Support | Sole Stiffness | Best Suited For |
|---|---|---|---|---|
| Lightweight hiking shoe (low cut trail shoe) | Under 1 kg per pair | Minimal | Flexible | Not recommended as your only pair on Manaslu due to the pass and gorge sections |
| Mid weight trekking boot, e.g. Salomon Quest range | Around 1.3 to 1.5 kg per pair | Good, supportive cuff | Moderate | Strong all round choice for the full circuit, including the pass in normal conditions |
| Sturdy trekking or backpacking boot, e.g. Scarpa or La Sportiva trekking lines | Around 1.5 to 1.8 kg per pair | Very good | Moderate to firm | Best balance of protection and weight for this specific trek |
| Heavy leather backpacking boot, e.g. Zamberlan Vioz or Meindl Bhutan | Around 1.7 to 2 kg per pair | Excellent | Firm | Trekkers who want maximum durability and warmth and do not mind extra weight |
| Full mountaineering boot with crampon compatibility | 2.5 kg or more per pair | Excellent but rigid | Very firm | Only needed if you are attempting a technical climb of Manaslu itself, not the standard circuit trek |
Whichever brand you land on, buy from a retailer with a genuine returns policy so you can walk around the house in the boots for a few days and send them back if the fit is wrong. Do not gamble on a brand new, untested model for a trip this significant.
How to Break In New Boots Before You Fly
This is the section I wish every trekker read before booking flights, because boot related problems are almost always preventable with enough lead time. If you are buying new boots for Manaslu, plan to have them in hand at least six weeks before departure, and ideally eight to ten weeks if you know your feet tend to be fussy or you have had blister problems in the past.
Start indoors. Wear the boots around your house for an hour or two on the first few days, with the socks you intend to trek in, so you can feel any obvious pressure points while you are still close to a shop that can help. Move to short outdoor walks of thirty minutes to an hour on pavement and easy trail for the first week, gradually increasing distance.
By week two or three, start adding your loaded daypack and walking on genuinely uneven ground, ideally with some hill climbing and descending, since flat ground breaking in tells you almost nothing about how the boot behaves on stairs or slopes, which is most of what Manaslu actually is. By week four, aim for at least one or two long walks of three to four hours in the boots, on the steepest terrain you can find near home, wearing your actual trek day sock combination.
Pay attention to where the boot rubs. A little stiffness in the first week is normal and expected, especially with a leather upper. Persistent rubbing in the same spot after several outings, however, is a sign the boot does not suit your foot shape, and it is far better to discover that at home than on day four of the trek between Jagat and Deng, days from the nearest vehicle road. If a spot keeps rubbing, try a different lacing pattern first, sometimes simply skipping an eyelet near the point of pressure solves it, before assuming the boot itself is wrong.
Never, under any circumstances, wear brand new, unbroken boots for the first time on the trek itself. I have watched this go wrong more times than I want to remember, and it is one of the few gear mistakes that can genuinely end someone’s trek early through blisters bad enough to become infected.
Sock Systems, Why Liner Plus Wool Combinations Matter
Socks get far less attention than boots, and they deserve much more, because the sock and boot work together as a single system. On Manaslu, where you will sweat in the lower valley and then need warmth at altitude, a two layer sock system is the approach I recommend to almost everyone I guide.
The base layer is a thin liner sock, usually made from a synthetic fiber or a fine merino blend, worn directly against the skin. Its job is to wick moisture away from your foot and, importantly, to move against the boot lining rather than against your skin, so that friction happens between the liner and the outer sock instead of between sock and skin. This is the single biggest factor in reducing blisters on a long trek, because most blisters form from repeated friction, not from a single rub.
Over the liner, wear a cushioned trekking sock made mostly of merino wool, or a wool and synthetic blend. Wool manages moisture far better than cotton, which holds sweat against the skin and becomes a genuine hazard for blisters and, at altitude, for cold related injury. Wool also retains some insulating ability even when damp, which matters on the cold mornings near Samdo and on the pass itself.
Bring at least three to four pairs of trekking socks and two to three liner pairs, so you can rotate and let pairs dry fully between wears, since drying options on the trail vary and a damp sock reused day after day is a blister waiting to happen. Change socks the moment your feet feel damp during a rest stop if you can, and always put on dry socks in the morning even if the previous day’s pair looks fine, since sweat and moisture accumulate invisibly.
Some trekkers prefer a slightly thicker single sock rather than a liner system, and that works fine for people who have used it for years without blister problems. My advice is simply not to experiment with a completely new sock system for the first time on the trek. Whatever combination you choose, test it during your break in walks so your boot fit accounts for the actual sock thickness you will use in Nepal.
Gaiters, When They Are Worth Using on This Route
Gaiters are one of those items that trekkers either swear by or leave in the drawer, and on Manaslu I think there is a genuinely good case for packing a pair, even if you do not wear them every single day. Their main job is keeping snow, scree and small stones out of the top of your boot, and on the days around Samdo, Dharamsala and the pass itself, that job matters.
A short gaiter, ankle height rather than a full mountaineering gaiter, is usually enough for this trek. It stops loose snow from getting into your boot on the approach to Larkya La, and it keeps grit and dust out of your boots on the dry, sandy sections in the lower valley, which is a smaller but real annoyance over many days of walking. You do not need a heavy, insulated gaiter built for deep winter mountaineering, since you are not likely to be wading through knee deep snow on a normal season crossing.
If you tend to get stones or grit in your boots easily, or if you are trekking in the shoulder season when snow depth at the pass can be less predictable, I would pack gaiters without hesitation. If your pack space is genuinely tight and you have never had trouble with debris getting into your boots on past treks, they are a reasonable item to leave behind, since a well fitted boot with a snug ankle cuff already keeps out most of what a gaiter would block.
Blister Prevention and Treatment on the Trail
Even with well broken in boots and a good sock system, blisters happen on a trek this long, so it pays to have a plan rather than hoping for the best. Prevention starts before you even leave your teahouse in the morning. Check your feet each day for hot spots from the day before, and address anything tender immediately with a blister prevention patch or a strip of tape over the area before it becomes a full blister, not after.
Carry a small foot care kit separate from your main first aid supplies so it is quick to reach at a rest stop. I recommend including specific blister dressings designed to stay on for multiple days, regular adhesive tape, a small pair of scissors, some alcohol wipes for cleaning the area, and a needle if you need to drain a blister that has already formed, since an unpopped large blister under continued pressure is more likely to tear open messily on its own.
If you feel a hot spot developing during the day, stop immediately rather than pushing on and hoping it settles. Two minutes spent taping a hot spot saves hours of pain and possibly a full rest day later in the trek. If a blister does form, clean the area, drain it with a sterilized needle if it is large and under pressure, leave the roof of skin in place rather than cutting it away since it protects the raw skin underneath, then cover with a proper blister dressing and tape it securely so it does not shift during the day’s walking.
Do not ignore a blister that shows signs of infection, meaning increasing redness, spreading warmth, pus or worsening pain rather than gradual improvement. Tell your guide immediately, since teahouses and lodges along the route generally have basic supplies and your guide will have handled this many times before. It is far better to raise it early than to keep quiet and hope it settles on its own.
Toenail Care and Why the Descents Cause Problems
The long descents on this trek, particularly the drop from Larkya La down to Bimthang and again on the final days toward Dharapani, are where toenail problems show up, and they catch a surprising number of experienced trekkers off guard. The mechanism is simple. On a steep, sustained descent, your foot slides forward inside the boot with every step, and if there is not enough space in the toe box, or your toenails are not trimmed short, the nail repeatedly jams against the front of the boot for hours at a time. The result is bruising under the nail, and in more severe cases the nail eventually loosens and can be lost weeks later.
The fix has three parts. First, trim your toenails straight across and fairly short in the days before you fly, not the night before, since very freshly cut nails can be tender. Second, make sure your boots have genuine room in the toe box, that thumb width of space I mentioned earlier when trying boots on, and be honest with yourself about whether your current boots actually provide it. Third, and this is the part most trekkers skip, lace your boots properly for descents. A snug lacing pattern through the lower eyelets combined with a slightly tighter lock at the ankle, sometimes called a heel lock lacing technique, stops your foot from sliding forward inside the boot on long downhill stretches, which is the single most effective thing you can do to prevent toenail damage on the Bimthang side of the pass.
If you know from past treks that you are prone to this problem, consider sizing your trekking boots a half size larger than your everyday shoe size to guarantee toe box room, and pair that with a slightly thicker sock so the extra volume does not create heel slip elsewhere in the boot.
Camp Shoes and Footwear for Teahouse Evenings
After a full day of walking, getting out of your trekking boots is one of the small pleasures of teahouse trekking, and having a dedicated pair of camp shoes makes a real difference to comfort and to foot recovery overnight. I recommend a lightweight pair of shoes or sandals that pack down small, whether that is a pair of foam clogs, lightweight camp sandals, or simple insulated slip on booties for the colder nights up near Samagaon, Samdo and the pass itself.
Camp shoes serve a few purposes beyond comfort. They let your feet and your trekking socks air out and dry properly overnight, which matters over a trek this long since damp boots and socks that never fully dry become a breeding ground for foot problems. They also give your feet a genuine break from the pressure points of your boots, and they mean you are not walking around a cold teahouse dining room in bare feet or in the same socks you have worn all day.
Closer to the pass, where nighttime and early morning temperatures drop well below freezing, a warm, insulated camp bootie is worth its small extra weight, since standing around outside a teahouse in Samdo in thin sandals is genuinely unpleasant. Lower down in the warmer valley sections, simple sandals or clogs are perfectly adequate and lighter to carry.
A Footwear Packing List for Manaslu
Pulling everything in this guide together, here is the footwear specific packing list I give trekkers before they join a Manaslu Circuit departure.
| Item | Quantity | Notes |
|---|---|---|
| Trekking boots, broken in | 1 pair (worn, not packed) | Mid to sturdy weight trekking boot, waterproof membrane, supportive ankle cuff |
| Liner socks | 2 to 3 pairs | Thin synthetic or fine merino blend |
| Trekking socks | 3 to 4 pairs | Cushioned merino wool or wool blend |
| Camp shoes or sandals | 1 pair | Lightweight, packable, for evenings at teahouses |
| Insulated camp booties | 1 pair (optional) | Worth it for cold nights near Samdo and the pass |
| Gaiters | 1 pair | Short ankle height gaiter for snow and grit |
| Blister prevention patches or tape | Several strips or a roll | Apply at first sign of a hot spot |
| Small foot care kit | 1 kit | Blister dressings, tape, scissors, alcohol wipes, sterilized needle |
| Nail clippers | 1 | Trim toenails short and straight before departure and again mid trek if needed |
| Foot powder or anti chafe balm | 1 small container | Helps manage sweat in the warm lower valley days |
| Spare bootlaces | 1 set | A broken lace far from a village is a genuine problem, carry a spare |
For the rest of your kit beyond footwear, our complete packing list for this region walks through everything else you need to bring.
Frequently Asked Questions About Footwear for the Manaslu Circuit
Do I really need waterproof boots for this trek?
Yes. Between wet stream crossings in the lower valley, spray from waterfalls along the gorge section, and slush and snow near the pass, you will encounter enough moisture on the trail that a boot without a genuine waterproof and breathable membrane will eventually soak through, and wet feet over many days lead directly to blisters and cold related discomfort.
Can I do the Manaslu Circuit in trail runners instead of boots?
Some very experienced, lightweight focused trekkers do complete treks like this in sturdy trail running shoes, but I would not recommend it for most people attempting Manaslu. The ankle support and toe protection of a proper boot matter on the gorge sections and on the loose descent to Bimthang, and the cold, sometimes icy conditions near the pass favor a warmer, more protective boot over a low cut trail shoe.
Do I need crampons for Larkya La?
Under normal conditions, no. This is a walking pass crossed on foot in good trekking boots, and guides carry judgment about conditions on the day. In unusually icy years, some groups use microspikes for extra grip, but full crampons and mountaineering boots are not standard requirements for the regular Manaslu Circuit itinerary.
How many weeks before the trek should I buy new boots?
Ideally six to ten weeks. That gives you enough time to walk in them regularly, including some longer, loaded, hilly walks, and still have time to return or exchange them if the fit turns out to be wrong once you have properly tested them.
What size should I buy relative to my normal shoe size?
Many trekkers do best in a half size larger than their everyday shoe, to leave enough room in the toe box for foot swelling on long days and to protect toenails on steep descents. Always try boots on in the afternoon, wearing the actual socks you plan to trek in, rather than relying on your usual shoe size alone.
Are gaiters necessary or just an extra item to carry?
They are not strictly necessary for everyone, but they are a small, light item that solves a real problem, keeping snow and grit out of your boots on the days around Samdo, Dharamsala and the pass. If you have had trouble with debris in your boots on past treks, pack a pair.
How do I prevent losing a toenail on the descent to Bimthang?
Trim your nails short and straight before the trek, make sure your boots have real space in the toe box, and lace your boots snugly through the lower eyelets with a firm lock at the ankle before starting any long descent, so your foot cannot slide forward and jam your toes against the front of the boot.
What should I do if a blister forms partway through the trek?
Stop as soon as you feel a hot spot rather than continuing to walk on it. Clean the area, drain a large, tense blister with a sterilized needle while leaving the skin roof in place, cover it with a proper blister dressing, and tape it securely. Tell your guide if it shows any sign of infection.
Is it worth bringing two pairs of trekking boots?
For most trekkers, no, a single well chosen and properly broken in pair is enough and keeps your pack lighter. What matters far more than owning two pairs is making sure the one pair you bring fits well, is genuinely broken in, and is paired with a sock system you have already tested on long training walks before you fly.
If any of this leaves you unsure which boots or sock setup will suit your own feet, or how this fits into the wider planning for the route, please get in touch before you book. You can read more detail on logistics, permits and pricing on our Manaslu Circuit Trek FAQ and cost, or look over the full Manaslu Circuit Trek itinerary to see exactly where each of these terrain changes falls on the schedule. For anything specific to your own feet, past blister history, or boot choice, contact Manaslu Treks and Expedition directly on WhatsApp or phone at +977 9869225929, by email at info@manaslutreks.com, or through our contact, and we will happily talk gear with you before you book.